By
Ronald E. Thompson
created on 7/27/97
Revised 6/14/02
The one I made is 2" ID scrap pipe 10' tall and 10' wide. The "feet" are 6' long. It is suprisingly strong and, if used correctly, can lift several thousand pounds. It can be used for a variety of things from loading trucks to pulling engines. I originally built mine to load, unload, and position a sawmill.
You can hang a hoist from a chain looped over
the cross bar for most lighter lifting jobs. Used like this the
top bar takes the weight. For extra heavy use, loop a chain
around the top sockets on either side, and hang the hoist from
this chain. This allows the top bar to act as a spreader instead
of carrying the load. It is much stronger this way. Several
hoists can be hung along the chain, giving you control over the
lift as well as making better use of the strength of the frame.
Note: NEVER GET BELOW AN OBJECT
WHEN IT IS ON A HOIST!
Parts list.
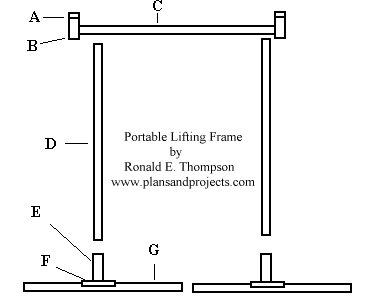
A. Stop pin. 1/2" or larger rebar or bolt. 2 required.
B. Top Socket. 2 1/2" ID pipe 6" long. 2 required.
C. Cross bar. 2" ID pipe 10' long.
D. Upright or Leg. 2" ID pipe 10' long. 2 required.
E. Bottom Socket. 2 1/2" ID pipe 12" long. 2 required.
F. Bottom socket support. 2 pieces of 1" X 1" X
1/4" angle iron edge welded to form a C channel 12 "
long. 2 required. ( 4 pieces of angle. )
G. Foot. 2" ID pipe 6' long.
Weld every place that is touching in the parts diagram. Part A,
the stop pin, is set in holes and welded. If you just put this on
top and weld, it will not be as strong. Part C, the cross bar, is
placed at the lower part of part B, The top socket, to allow a
chain to be wrapped around the top sockets for heavy lifting.
There are no pins in the joints to allow easy movement and
erecting, and none are needed.
To put it up:
To erect the frame, place all parts on the ground as in
the drawing. Put the legs into the sockets, making sure they go
in all the way. Wether you are using a short loop of chain around
the cross bar, or a longer chain over the top sockets, now is a
good time to put it on, unless you have a ladder handy. Drive
some scrap pipe or angle iron into the ground below the feet to
prevent the frame from sliding while being erected. Using a good
rope or a chain, attach the loop of chain (on the top of the
frame) to the rear of your vehicle. Propping the cross bar up on
something 4 or 5' tall will make erecting easier. Pull the
vehicle forward to raise the frame to an almost
vertical position. Be careful not to pull too far! Pulling the
frame past vertical will put a serious dent in your vehicle.
Allow for the weight of the chain! It can pull it past vertical
if you are not careful. With the frame almost vertical and
supported by the vehicle, turn the feet so they support the
frame. Remove the vehicle.
If the frame is not just where you want it, it can be moved by
lifting the end of a foot slightly and dragging it into position.
I like to use a crowbar or claw hammer for this, so I don't have
to bend over as far. Move one side at a time until it is where
you want it. Be careful not to move one side too far at a time
and keep the feet turned to support the frame.
To take it down:
To knock down the frame, make sure the area is clear, turn the
feet to the original position, give it a gentle push in the
direction you want it to fall and get out of the way! It will
fall to the ground and you can take it apart.
This all sounds more complicated than it is. After you use it
once or twice you'll wonder how you got along without it.
Be careful. Rigging and lifting can be dangerous. But it is not
beyond most do it yourselfers. As I have no
control over the quality of your welds, the materials you choose,
or anything else, I accept no resposibility for your use of this
project. Mine is worth it's weight in gold to me. I hope
you find this useful.
A special thanks to Ted Edwards, who kept a
copy of this after I had lost the original.
Ted made a smaller version of this hoist.